TOC
Overview
This guide walks you through manually deploying a containerized application to AWS ECS (Elastic Container Service) using the AWS Console. You’ll create a task definition, ECS cluster, and run tasks on AWS Fargate.
Prerequisites:
- AWS CLI configured
- ECR repository created and Docker image pushed (see Create ECR (Console))
- Docker image built and ready
Quick Start Checklist
- Step 1: Verify Docker Image in ECR
- Step 2: Create Task Definition
- Step 3: Create ECS Cluster
- Step 4: Run a Task
- Step 5: Get Public IP
- Step 6: Test Your Service
Step 1: Verify Docker Image in ECR
Before proceeding, verify that your Docker image was successfully pushed to ECR:
# List images in your repository
aws ecr list-images \
  --repository-name <REPOSITORY_NAME> \
  --region <AWS_REGION> \
  --query 'imageIds[*].imageTag' \
  --output table
# Example
aws ecr list-images \
--repository-name hello-service \
--region us-west-1 \
--query 'imageIds[*].imageTag' \
--output tableExpected output:
-----------
|ListImages|
+----------+
|  latest  |
+----------+
If you see your image tag listed, you’re ready to proceed!
Step 2: Create Task Definition
A Task Definition is a blueprint that defines how to run your container. It specifies the Docker image, CPU, memory, ports, environment variables, and IAM roles.
1. Navigate to Task Definitions
- Go to AWS Console
- Search for “ECS” and click “Elastic Container Service”
- In the left menu, click “Task definitions”
- Click “Create new task definition”
2. Configure Task Definition
Fill in the following settings:
- Task definition family:
hello-task - Launch type: AWS Fargate
- Operating system/Architecture: Linux/X86_64
- CPU: 0.25 vCPU (256 CPU units)
- Memory: 0.5 GB (512 MB)
- Task role: Select
LabRole(pre-created in Learner Lab) - Task execution role: Select
LabRole
Note: The task execution role allows ECS to pull images from ECR and write logs to CloudWatch. The task role is used by your application code.
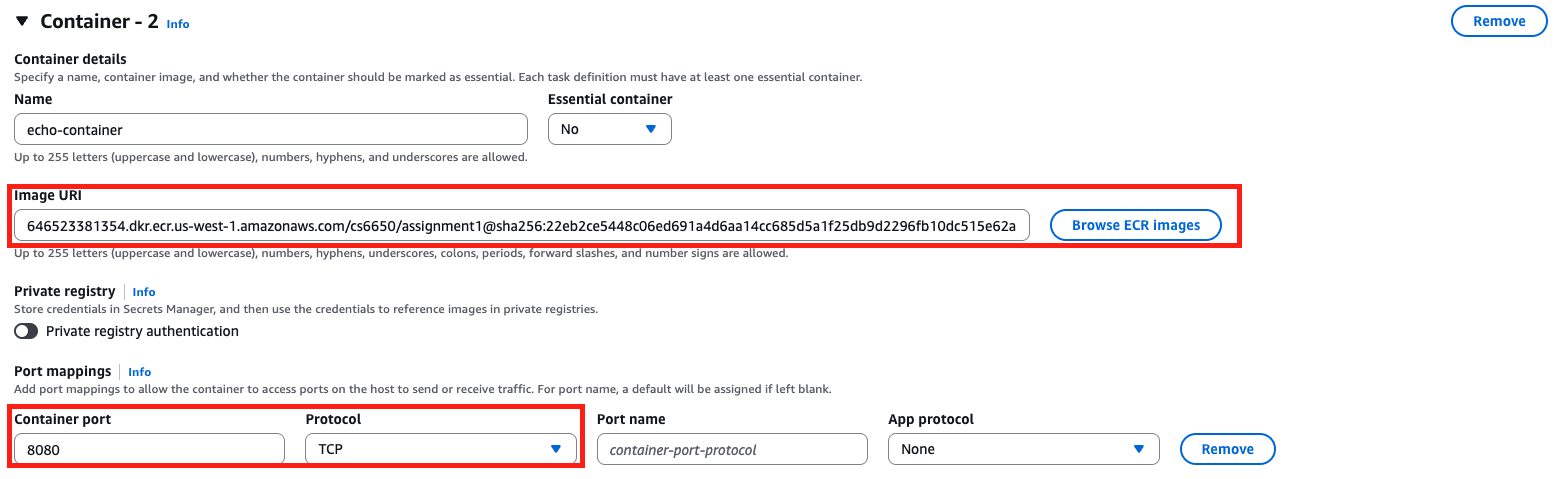
3. Add Container
- Click “Add container”
- Fill in container details:
- Name:
hello-container - Image URI: Paste your ECR URI with tag
- Example:
123456789012.dkr.ecr.us-east-1.amazonaws.com/hello-service:latest
- Example:
- Port mappings:
- Container port:
8080 - Protocol: TCP
- Container port:
- Leave other settings as default
- Name:
- Click “Add”
4. Create the Task Definition
- Review your settings
- Click “Create”
You should see a success message and your task definition listed.
Step 3: Create ECS Cluster
An ECS Cluster is a logical grouping of tasks and services. With Fargate, the cluster doesn’t manage EC2 instances - it’s just a logical container for your workloads.
Important Note on Cluster Creation
Known Issue: Cluster creation may fail the first time you attempt it, but succeeds on the second try.
Workaround:
- First attempt: Create a dummy cluster (e.g.,
hello-service-dummy) - Second attempt: Create your real cluster (e.g.,
hello-cluster)
Steps to Create Cluster
-
Navigate to Amazon ECS:
- In AWS Console, search for “ECS”
- Click on “Elastic Container Service”
-
Create Cluster:
- Click “Create Cluster”
- Cluster name:
hello-cluster - Infrastructure: AWS Fargate (serverless) - should be selected by default
- Leave other settings as default
- Click “Create”
Understanding ECS Clusters
- Cluster: Logical grouping of tasks or services
- Fargate vs EC2:
- Fargate: Serverless (AWS manages servers), pay only for CPU/memory used
- EC2: You manage EC2 instances, more control but more complexity
- Pricing: With Fargate, you pay only for the CPU and memory your containers use
AWS Fargate is a serverless compute engine for containers that does not require you to manage servers.
Step 4: Run a Task
Now that you have a task definition and cluster, you can run a task (an instance of your container).
1. Navigate to Your Cluster
- Go to Clusters →
hello-cluster - Click on the “Tasks” tab
2. Run New Task
- Click “Run new task”
- Configure the task:
- Task definition family: Choose
hello-task - Task definition revision: Choose latest
- Desired tasks: 1
- Task definition family: Choose
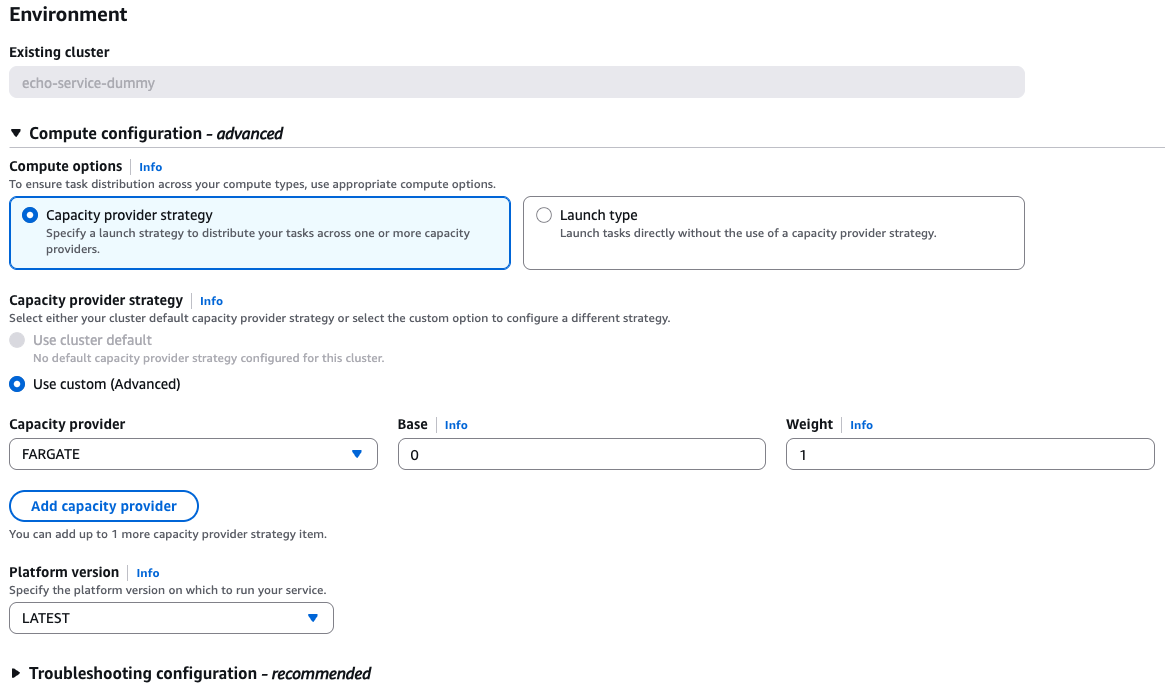
3. Configure Compute
- Choose Capacity provider strategy → Use custom (Advanced)
- Capacity provider:
- Fargate Spot (recommended for cost savings, ~70% cheaper)
- Or Fargate (regular, more reliable)
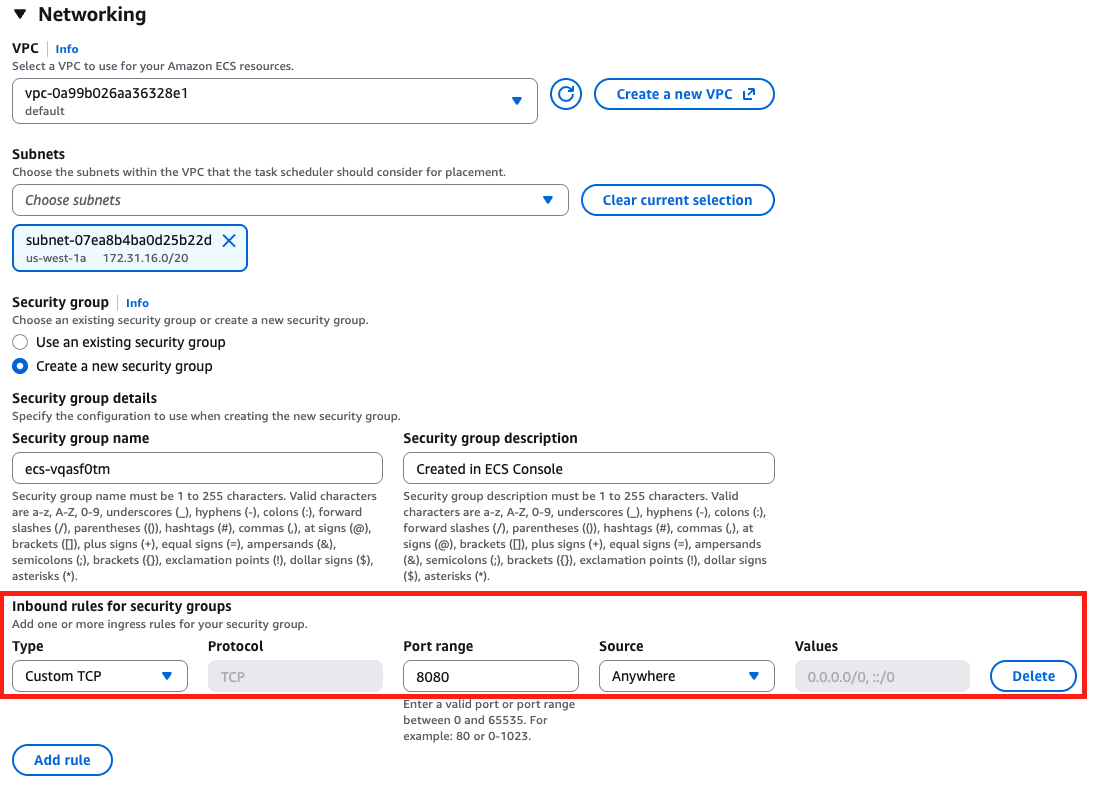
4. Configure Networking
This is critical for accessing your service:
- Cluster VPC: Select the default VPC
- Subnets: Select at least one subnet (preferably in
us-east-1a) - Security groups: Click “Edit”
- Create new security group
- Security group name:
hello-service-sg - Inbound rules: Add rule
- Type: Custom TCP
- Port range:
8080 - Source: Anywhere (this will auto-set the CIDR to
0.0.0.0/0)
- Public IP: Turn ON (Important! This allows internet access)
5. Run the Task
- Click “Create” (this will run the task)
- In the Task list, wait for the task to transition:
- PROVISIONING → PENDING → RUNNING
This typically takes 1-2 minutes. Once it shows RUNNING, your container is live!
Step 5: Get Public IP
You need the public IP address to access your service. There are two ways to get it:
Option 1: Using AWS Console (Easiest)
- View Task Details:
- In the Tasks tab, click on the task ID (long string)
- Under “Configuration” section, look for “Public IP”
- Copy this IP address
Example: 35.174.213.55
Option 2: Using AWS CLI (Recommended for Automation)
Step-by-Step Commands
-
Get the task ARN:
TASK_ARN=$(aws ecs list-tasks \ --cluster hello-cluster \ --region us-east-1 \ --query 'taskArns[0]' \ --output text) -
Get the ENI (Elastic Network Interface) ID:
ENI_ID=$(aws ecs describe-tasks \ --cluster hello-cluster \ --region us-east-1 \ --tasks $TASK_ARN \ --query 'tasks[0].attachments[0].details[?name==`networkInterfaceId`].value' \ --output text) -
Get the Public IP (with fallback):
# Try to get from Association first
PUBLIC_IP=$(aws ec2 describe-network-interfaces \
  --network-interface-ids $ENI_ID \
  --region us-east-1 \
  --query 'NetworkInterfaces[0].Association.PublicIp' \
  --output text)

# If not found in Association, try direct PublicIp
if [[ -z "$PUBLIC_IP" ]] || [[ "$PUBLIC_IP" == "None" ]]; then
  PUBLIC_IP=$(aws ec2 describe-network-interfaces \
    --network-interface-ids $ENI_ID \
    --region us-east-1 \
    --query 'NetworkInterfaces[0].PublicIp' \
    --output text)
fi

# Display the IP
if [[ -z "$PUBLIC_IP" ]] || [[ "$PUBLIC_IP" == "None" ]]; then
  echo "Error: Could not get public IP. Is the task running with a public IP?"
else
  echo "Public IP: $PUBLIC_IP"
fi
One-Liner Version
For quick access, use this one-liner:
PUBLIC_IP=$(aws ecs list-tasks \
  --cluster hello-cluster \
  --region us-east-1 \
  --query 'taskArns[0]' \
  --output text | \
  xargs -I {} aws ecs describe-tasks \
    --cluster hello-cluster \
    --region us-east-1 \
    --tasks {} \
    --query 'tasks[0].attachments[0].details[?name==`networkInterfaceId`].value' \
    --output text | \
  xargs -I {} aws ec2 describe-network-interfaces \
    --network-interface-ids {} \
    --region us-east-1 \
    --query 'NetworkInterfaces[0].Association.PublicIp' \
    --output text)

echo "Public IP: $PUBLIC_IP"
Step 6: Test Your Service
Once you have the public IP, test your service:
# Basic test
curl http://$PUBLIC_IP:8080/api/hello

# Test with your name
curl http://$PUBLIC_IP:8080/api/hello/YourName
Expected response: JSON response from your application.
Troubleshooting
Task Won’t Start
| Issue | Solution |
|---|---|
| Task stops immediately | Check CloudWatch logs for errors: aws logs tail /ecs/hello-task --follow |
| Task in STOPPED state | Click on task → Check “Stopped reason” and “Last status” |
| Cannot pull image | Verify image exists in ECR and image URI is correct |
| Port conflict | Check container port matches your application port |
Networking Issues
| Issue | Solution |
|---|---|
| No public IP assigned | Ensure “Public IP” is turned ON in task configuration |
| Connection refused | Check security group allows port 8080 from 0.0.0.0/0 |
| Connection timeout | Verify task is in RUNNING state, not PENDING |
| Can’t get public IP via CLI | Ensure --region parameter is included in all commands |
ECR Issues
| Issue | Solution |
|---|---|
| Image not found | Verify image was pushed: aws ecr list-images --repository-name hello-service |
| Access denied | Check task execution role has ECR read permissions |
Common Mistakes
- Forgot to enable Public IP: Task runs but has no internet access
- Wrong security group: Port 8080 not open to 0.0.0.0/0
- Wrong image URI: Check the full ECR URI includes account ID and region
- Task execution role missing: ECS can’t pull image from ECR
Clean Up Resources
To avoid charges, clean up when done:
Stop Running Tasks
- Go to Clusters →
hello-cluster→ Tasks tab - Select the running task
- Click “Stop”
- Confirm
Delete Resources (Optional)
- Delete Task Definition (if not needed):
- Task Definitions → Select
hello-task→ Delete
- Task Definitions → Select
- Delete Cluster (if not needed):
- Clusters → Select
hello-cluster→ Delete
- Clusters → Select
- Delete Security Group (if not needed):
- EC2 → Security Groups → Select
hello-service-sg→ Delete
- EC2 → Security Groups → Select
Note: ECR repository and images can be kept (minimal storage cost).
Key Concepts Summary
ECS Components
- Task Definition: Blueprint for your container (CPU, memory, image, ports, IAM roles)
- Task: Running instance of a task definition
- Cluster: Logical grouping of tasks/services
- Fargate: Serverless compute (no EC2 management)
Workflow
- ECR: Store Docker images
- Task Definition: Define how to run container
- Cluster: Create logical environment
- Task: Run instance of container
- Access: Use public IP to reach service
Fargate vs EC2 Launch Type
| Feature | Fargate | EC2 |
|---|---|---|
| Server Management | AWS manages | You manage |
| Setup Complexity | Simple | More complex |
| Cost | Pay per task | Pay for EC2 instances |
| Scaling | Automatic | Manual or auto-scaling |
| Use Case | Most applications | Need specific EC2 features |
Next Steps
After successfully deploying:
- Create an ECS Service to maintain desired number of tasks
- Add Application Load Balancer for production traffic
- Set up Auto Scaling based on CPU/memory
- Implement CI/CD pipeline for automated deployments
- Add CloudWatch monitoring and alerts
Related Topics
- Create ECR (Console) - Setting up ECR repository
- AWS CLI v2 - AWS CLI configuration
- IAM - IAM roles for ECS
- use Terraform Deploy ECS - Automated deployment with Terraform
- 00-Content - ECS core concepts